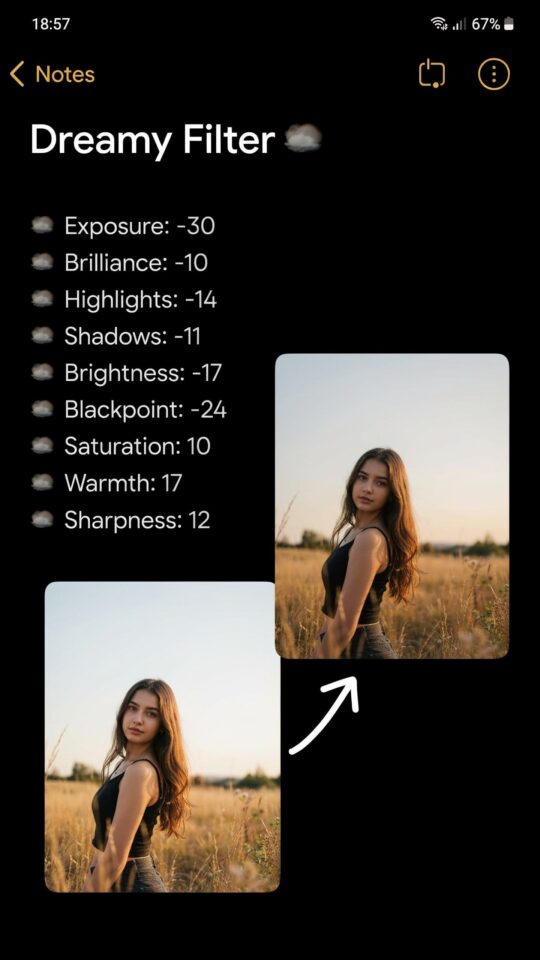
If you’ve been searching for Lightroom preset ideas to create moody portrait edits, you’ve probably run into the same frustration I did when I started. You pull down the shadows, push the greens towards olive, and end up with a face that looks like it belongs in a horror movie. Or you get that gorgeous, soft, cinematic vibe but only when the lighting is absolutely perfect. The truth is, most moody portrait editing tutorials leave out the hard part, the mistakes that turn a good photo into a muddy mess. I’ve made every single one of those mistakes, and I’m going to walk you through them so you don’t have to.
Overdoing the Shadows: The Number One Mistake in Moody Portrait Editing
The first thing everyone does when aiming for a moody look is drag the shadows slider all the way down. It feels right. Deeper shadows equal more mood, right? Wrong. When you crush the shadows completely, you lose all detail in the hair, clothing, and background. The image becomes flat and lifeless, not moody.
Instead, try a subtle approach. Lower the shadows by about 20 to 30 points, then lift the blacks slightly (maybe +10) to keep some depth without losing texture. Your subject’s hair will still have definition, and the background will feel rich, not dead. A good rule of thumb is to check your histogram. If it’s touching the left edge hard, you’ve gone too far.
Getting the Greens Wrong: Why Earthy Tones Look Muddy
Earthy tones are a cornerstone of moody portrait editing, but they’re also where most people accidentally turn their foliage into swamp sludge. The classic mistake is simply desaturating greens or shifting the hue too far toward yellow. That creates a brown, lifeless mess that pulls the whole image down.
Here’s what actually works. In the HSL panel, move the green hue slider slightly toward blue (around +20 to +30). Then reduce the saturation of greens by 40 to 50 percent, but not all the way to zero. Finally, increase the luminance of greens a little to keep them from sinking. You want muted, dusty greens, not dead ones. For yellows, shift them slightly toward orange to avoid that sickly look. This small tweak makes your outdoor portraits feel like a foggy forest, not a forgotten swamp.
Forgetting About Skin Tone Balance in Cinematic Looks
That cinematic, warm skin tone everyone loves comes from careful balance, not just warming the whole image. People often crank up the temperature slider or add a lot of orange in the split toning, which turns skin either too red or too yellow. Suddenly your subject looks sunburned or jaundiced.
The trick is to isolate skin tones in the HSL panel. Target the orange and red channels specifically. Shift orange hue slightly toward red (maybe -10) and increase orange luminance by 10 to 15 points. This warms the skin without blowing it out. Then use the calibration panel to add a subtle green tint to the shadows and a warm tint to the highlights. That gives you the contrasty, filmic look without the orange face. Test these settings on a few different skin tones to make sure they hold up.
Relying Only on Presets Without Manual Adjustments
I love a good preset as much as anyone, but treating them like a one click magic wand is a fast track to disappointing results. The biggest mistake is applying a moody preset and calling it done, even when the exposure or white balance is off. Each photo has its own lighting, and a preset that looks amazing on a golden hour shot can ruin an overcast studio portrait.
Always start by setting your white balance and exposure manually. Then apply your preset as a base, not a finish. Adjust the tone curve to match the specific contrast of your image. Use the mask tool to brighten your subject’s face if the preset drops the shadows too much. Think of presets as a shortcut, not a solution. A real moody edit needs your eyes and your tweaks.
- Do adjust white balance first, every time.
- Do use the brush or radial filter to protect skin tones.
- Don’t assume a preset will work on different cameras or lighting conditions.
- Don’t forget to check the preset on a skin tone sample before applying to a full session.
Ignoring the White Balance: How It Ruins Soft Shadows
Soft
#LightroomPresets #MoodyPortraitEditing #PhotoEditingTips #PortraitPhotography #LightroomTutorials
Leave a Comment