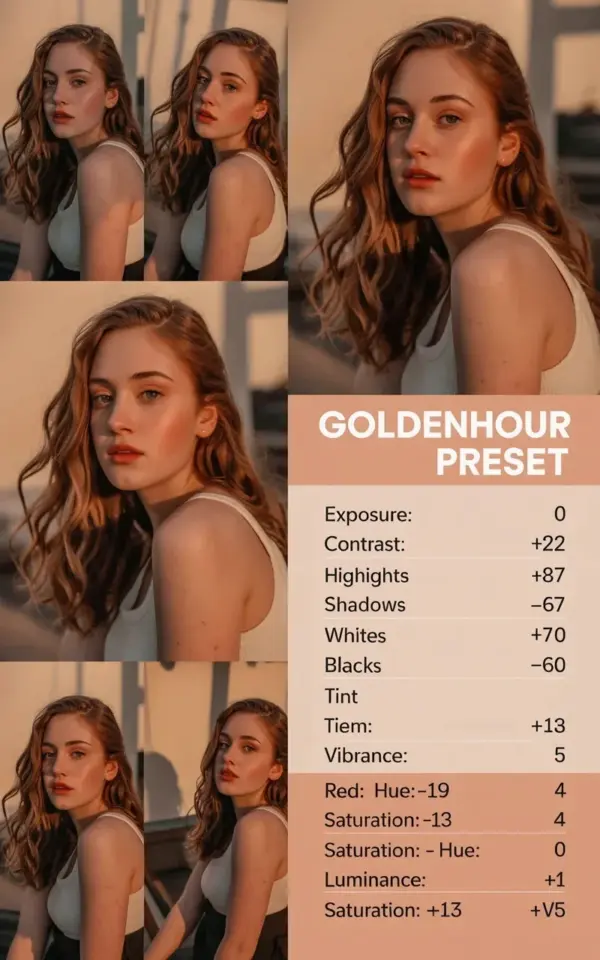
Oh man, I have definitely made that specific golden hour photo preset mistake, and it cost me a friendship for a whole weekend. I loaded it up. I was excited. The colors looked so good in the little preview window. But then I zoomed in on her face and the highlights were completely blown out and her skin looked like a Cheeto. Not the cute, snackable kind either. The kind that leaves orange dust all over your fingers. Straight out of the box, those warm filters are a trap. Honestly, I almost gave up on presets entirely because of it. But here is the truth: the preset isn’t the problem, it is usually just your room lighting or the time of day you shot at.
Why Your Golden Hour Preset Makes People Look Orange (And How to Fix It)
It all comes down to the white balance. Preset creators usually build their looks using their own photos. And surprise, they probably shot them during actual golden hour. So when you apply that same warmth level to a photo taken in the shade or under heavy clouds, the software just throws a massive blanket of orange over everything. I saw a tutorial once that said to just drop the Temperature slider by 15 points immediately. Do that. It saves the skin tones. I also mess with the Tint slider a tiny bit towards magenta if the skin starts looking sickly yellow. Natural warmth should feel like a cozy hug, not a fever.
The One Setting You Need to Adjust Before Anything Else
Look at the photo collage at the top of this post. See that section on the right labeled “Exposure”? That is the key. Most golden hour presets love to drop the exposure to create drama and deep shadows. And yeah, it looks artsy. But on a portrait? It makes the eyes look dead and the skin look muddy. I always raise the Exposure slider just a little bit after applying the preset. Like +0.30. It brings the life back into the face. Just be careful. If you raise it too much you will blow out the highlights on the nose and forehead. That is another photo editing mistake that is super hard to fix later.
The Budget Photographer’s Guide to Golden Hour Presets
You do not need to spend a hundred bucks on a preset pack that makes you look like a Sims character. I bought a pack for $9 on Etsy once from a guy in Ukraine and it was way better than the expensive influencer pack I had. The cost does not equal the quality. It equals the advertising budget. Here is what I actually spend my money on:
- Fresh walnuts (weird, I know, but I need the brain fuel for dragging sliders around).
- A good chair because hunching over a laptop ruins your back and your editing flow.
- Maybe a $5 preset pack if I want to study how someone else handles the color palettes.
Spending more money just makes you poorer, not a better photographer. Save your cash. There are free Lightroom Mobile presets that work perfectly fine if you just take the time to adjust the opacity.
How to Match a “Golden Hour” Vibe to Any Lighting Situation
Here is the thing. You cannot fake actual golden hour light. But you can fake the emotional warmth of it. If you shot at high noon and the light is harsh, do not try to make the whole scene look like sunset. It will look fake. I use a radial filter in Lightroom. I put it over just the face. Then I bump up the warmth on the skin only. Not the background. Just the person. This creates that illusion of soft, warm light hitting the subject. It is so much easier than fighting the whole photo. And it keeps the background looking natural, which is honestly better for depth of field anyway.
The Biggest Photo Editing Mistake I See in Facebook Groups
I spend
#goldenhourpreset #portraitphotography #phototips #goldenhouredit #photoeditingmistakes
Leave a Comment