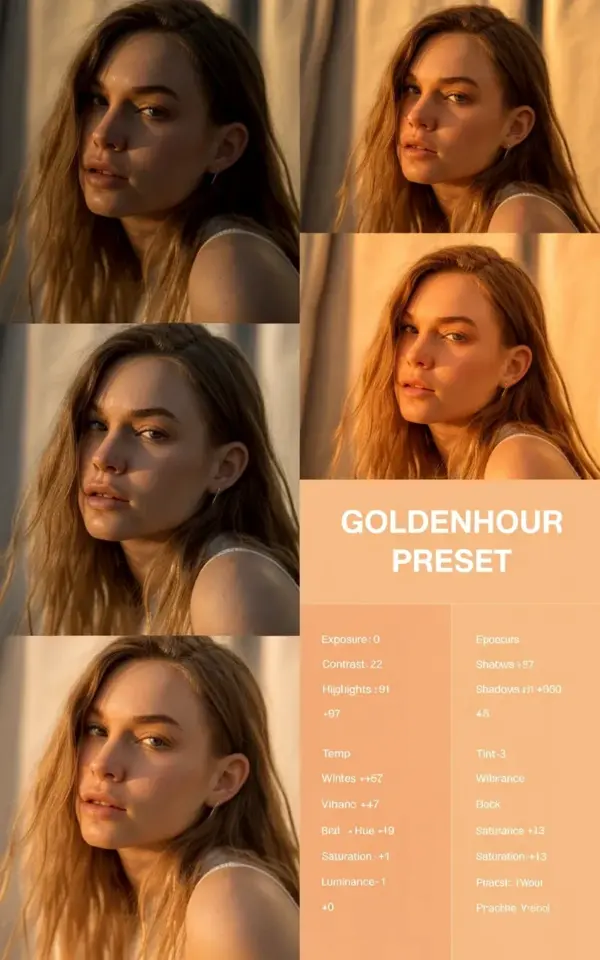
That peach-toned collage is everywhere right now, and honestly, I get it. The white “GOLDENHOUR PRESET” label sits there like a promise, and all five portraits of that woman with the wavy brown hair have the same warm, buttery glow. It’s a gorgeous example of what a goldenhourpreset can do, but here’s the thing. You don’t need to buy that exact pack to recreate the look on your own budget.
Look closer at the photo and you’ll notice the technical breakdown on the right side, the exposure notes, the soft shadows, the peachy highlights. That’s not magic. It’s a set of Lightroom moves you can learn, tweak, and even save as your own personal preset. So if you’re a portrait photographer who’s tired of paying $50 for a zip file, this one’s for you.
Why the Golden Hour Preset Collage Works So Well
The collage format is actually part of the appeal. Instead of a single before and after, you get five different angles, all showing the same model in the same warm light. That repetition tells your brain, “This preset is consistent.” And consistency is what you actually pay for when you buy presets, whether it’s a goldenhourpreset or a moody indoor pack.
The peach background and white text do a lot of heavy lifting too. They make the skin tones look even warmer, so your eye associates the preset with that specific glow before you even open Lightroom. It’s smart marketing, but it’s also a good lesson. The way you present your edits matters as much as the sliders themselves.
For the record, the model in the pictures has fair skin, long wavy hair, and the light is hitting her from the side, not straight on. That’s why the shadows fall so softly across her face. If you’re shooting someone with different skin tones or in harsher midday sun, you’ll need to adjust things. No preset is a one-click miracle.
Reading the Exposure Breakdown Without a Photography Degree
That right-hand block of text on the collage, the four sections with the word “Exposure” at the top, isn’t just decoration. It’s telling you exactly how the photographer got those soft shadows and peachy tones. Usually a breakdown like that lists things like exposure, contrast, highlights, and whites. When you see exposure sitting on the positive side, but shadows lifted slightly, that’s the recipe for creamy, warm skin.
Here’s what I actually look at when I see a breakdown like that. I ignore the exact numbers and focus on the relationship between highlights and shadows. If highlights are pulled down and shadows are pulled up, you’re getting that flat, hazy look that makes golden hour feel dreamy. If exposure is bumped up just a little, the whole image goes bright without turning harsh. That’s the trick.
Most photographers don’t share their full camera settings in these collages. They share the preset breakdown because it’s simpler and more sellable. So don’t stress about replicating the exact f-stop or shutter speed. Look at the tonal curve. That’s where the real transformation happens.
How to Match These Warm Portrait Tones With Free Lightroom Sliders
You can absolutely recreate this golden hour preset vibe using only the free Lightroom mobile app and a little patience. Start with a portrait that already has decent light, then open your Color Mixer panel. The key is to push orange and red luminance up just a touch, then nudge the warm tones in the yellow hue toward the peach side. It’s not a science, honestly, it’s more like seasoning food.
I’ve spent way too many evenings dragging the same three sliders back and forth. My exact method for a look like this is embarrassingly simple. Raise the temp to about 5800K, drop highlights to -40, lift shadows to +25, and then add a tiny bit of dehaze, like +5, to keep it from going flat. After that, go into the HSL panel and give the orange luminance a +15 boost.
That’s it. Two minutes of work and you’re close to the collage look. The reason presets exist is to save you those two minutes every single time, but you don’t need to pay for what you can learn in an afternoon.
The Budget Photographer’s Lightroom Preset Strategy
Not gonna lie, I still buy presets sometimes. But I’ve got a system now so I’m not blowing my whole paycheck on someone else’s digital sliders. Here’s what I do when I’m hunting for a warm portrait preset on a budget:
- Search for “free Lightroom presets” on Adobe’s own community page first, they’ve got genuinely good ones buried in there.
- Look for preset packs that offer a preview collage with the exact exposure breakdown visible, like the one we’re talking about. If the photographer hides the numbers, I’m suspicious.
- Buy from a small creator on Etsy or Gumroad, not the big influencer packs with huge markups. You’ll get something original and the quality is usually identical.
That last one is how I found my current go-to pack. It was $12 and came with 15 presets, including a golden hour one that makes skin look like it’s been dipped in honey. The collage in the listing looked almost exactly like the peach one you’re seeing now, same warm tones, same soft shadows, same wavy-haired model. At half the price of the big names, it was a no-brainer.
Golden Hour Shooting Tips That Make Your Preset Work Better
A preset can only do so much if the original photo is garbage. Golden hour photography is mostly about timing, not gear. You want to shoot when the sun is about 15 degrees above the horizon, which is roughly the last hour before sunset. That’s when the light turns from yellow to that deep, peachy orange that makes everyone look like they’re glowing.
Here’s the thing nobody tells you about soft shadows. You don’t get them by putting your subject directly in the sun. You get them by turning your subject slightly away from the light source, so the sun hits the side of the face and the shadow falls naturally across the other cheek. In the collage, that’s exactly what’s happening in all five shots. The photographer clearly knows how to pose someone to catch the light.
And if you’re shooting with a phone, don’t worry about it. Modern phones handle golden hour light beautifully, especially portrait mode. Just tap the brightest part of the frame to set the exposure, then bring the exposure slider down a hair. That’s a free preset right there in your camera app.
Why I Stopped Buying Expensive Preset Packs
I remember buying a $60 preset pack a few years ago because the collage looked exactly like the one we’re discussing. It had the same peach background, the same model with wavy brown hair, and the same technical notes on the side. I opened Lightroom, applied the preset to a quick portrait of my friend, and it looked… fine. Not bad, but not miraculous either.
Then I compared it to a preset I’d made myself by just messing around with the sliders, and honestly, mine was better. Because I knew what every slider did, I could adjust for the weird fluorescent light in that specific coffee shop. The expensive pack was a one-size-fits-all guess. My homemade preset was an edit I actually understood.
That’s not to say presets are a scam. They’re great for inspiration and speed. But the sooner you learn to read the exposure breakdown and understand the relationship between warm tones and soft shadows, the less you’ll need to rely on someone else’s interpretation of beautiful light. And your wallet will thank you.
Anyway, if you’re stuck on a portrait and the colors feel flat, try the free slider method first. Drag the temperature up, drop the highlights, lift the shadows, and add a little orange luminance. You might not nail the exact peach glow from the collage, but you’ll get close enough to save that $60 for a memory card instead. I know which one I’d rather buy.
Leave a Comment