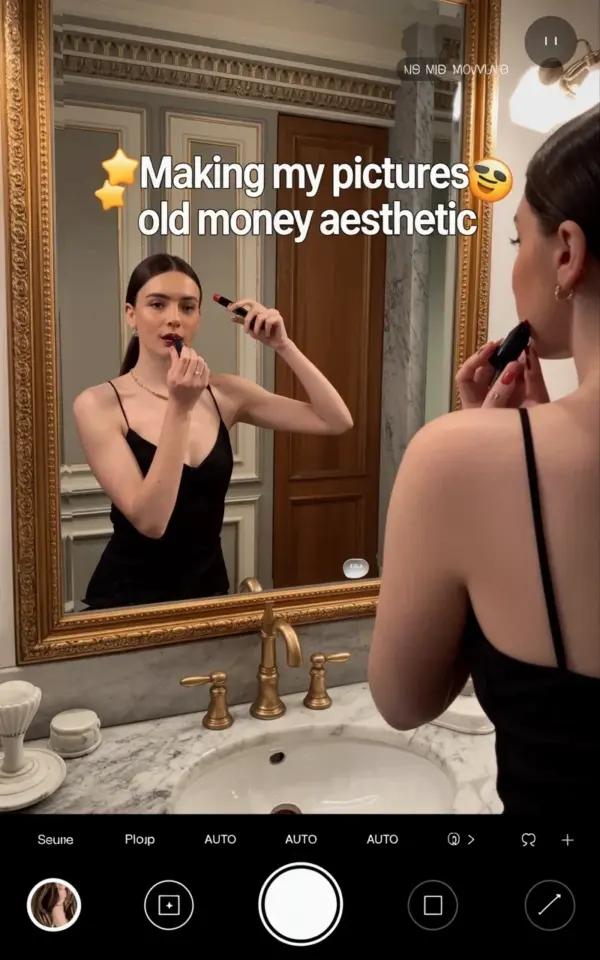
The mirror selfie in your bathroom could easily pass for a five-star hotel moment, and this old money aesthetic Lightroom preset is the entire reason why. You know the look, warm golden light, marble surfaces that actually gleam, and a finished vibe that makes it seem like you have your life together even if your laundry is piled up behind the camera. Get into your own gold bathroom edit, no expensive hotel stay required, because all of this can happen right in your own house.
The photo of the woman in the black spaghetti strap dress with the ornate gold mirror and perfect marble countertop got me thinking about how much of that classy look is actually about the edit. Her applying lipstick as if it were the most natural thing in the world while the warm light bounced off everything in sight, that’s not luck, that’s a good preset doing the heavy lifting. Let me show you how to get that same effect, even if your bathroom is more basic than beautiful, because honestly, the right editing can fool everyone.
## Why Your Bathroom Might Be the Only Backdrop You Need
Most people think they need a fancy location to get those high-end mirror selfies, but that’s just not true. Your bathroom is probably fine, you just haven’t learned how to see it the way a photographer would. Look for the spots where natural light hits the tiles or the mirror, those are the golden zones.
The palette in the reference photo is warm cream, soft tan, and rich gold, colors that feel expensive because they are usually found in homes that cost a fortune. You can mimic that with just a few small changes, think a thrifted gold frame mirror or even just a discounted gold faucet cover. Honestly, the wood paneling and intricate moldings are nice, but the warmth of the preset does most of the work to hide any imperfections.
Here’s the thing, you don’t need a real marble countertop to pull this off. A vinyl wrap or a simple marble-patterned contact paper can transform a dated vanity for under twenty bucks. The goal is to create a little corner that reads as luxury, and the editing will smooth out the rest.
## The Secret Is in the Warmth, Not the Wallet
The old money aesthetic isn’t about showing off wealth, it’s about looking established and comfortable in your own skin. That translates to photos that feel sun-drenched and relaxed, even if you took them at 10 PM with a ring light. The warm golden tone is the absolute hero of this preset, it instantly washes away any dull or cold tones.
You want to push the temperature slider up, but don’t go too crazy or everyone will look orange. I found that a small bump in warmth, combined with shifting the tint slightly towards magenta, gives that soft, expensive glow. It’s a subtle trick that separates the basic edits from the ones that look like they were done by a professional.
Now, the contrast, this is where it gets interesting. Lowering the contrast slightly and instead playing with the highlights and shadows individually creates that creamy, soft finish. Pull the shadows up a bit to open up the darker areas, especially near the sink and the floor, but keep the blacks deep enough to maintain some structure. It’s a balancing act, but the payoff is a photo that has a faded, yet crisp, quality.
## Start With the Basics, Then Add Your Own Touch
Before you even open Lightroom, you need a photo that has some potential. Take a few different shots, maybe one with you looking down at your phone and one mid-laugh, so you have options to work with. The really great part about mirror selfies is how candid they can feel, so don’t just pose stiffly.
Once you have your shot, start with a preset that has that warm foundation, or simply adjust the white balance first. I usually start with a neutral base and then slide the warmth up to around 40, depending on my lighting. From there, I like to check the histogram to make sure nothing is blown out, especially in the highlights of the gold fixtures.
Getting the skin tone right is a whole other beast, but here’s a simple way to handle it:
– Open the Color Mixer (or HSL panel) and go to the Orange and Yellow sliders.
– Decrease the Luminance slightly to add a bit of richness, but not too much.
– Make sure the Saturation is not fighting the warmth; you want a natural tan, not a fake bake.
– Always give your skin a quick check by zooming in to see if any weird color casts show up.
This approach keeps everything looking human and natural, which is exactly what this aesthetic needs. It’s all about enhancing what is already there, not creating a cartoon version of yourself.
## Nail the Gold and Green in Your Gold Bathroom Edit
There is something magical about the mix of gold and green tones in a bathroom, it feels organic and botanical. The plants in the photo, even if they are fake like mine, add that finishing touch that makes the whole space look intentional. Adding a touch of green to the shadows can actually make the gold pop even more.
In Lightroom, you can use a split-toning method to introduce a subtle green tint to the darkest parts of the photo. This tricks the eye into seeing more depth and texture in the wood and the marble. Don’t overdo it, you just want a whisper of color, not a full-on filter effect.
And here is a weird little tip from my own editing process, I always make sure the yellow star emojis or any bright text overlays fit the color scheme. If you are adding text to your own mirror selfie, try a warm white or a pale gold, it looks much more cohesive than a stark pure white. It’s a tiny detail, but it shows you actually thought about the overall vibe, not gonna lie.
## Comfy, Classy, and Budget-Friendly Gear for Mirror Selfies
You do not need a $500 camera to make this work, your phone is more than capable, especially if you clean the lens first. The bigger issue is usually your lighting situation, since a dark bathroom will kill any aesthetic quickly. You can grab a basic ring light with a stand for around thirty bucks, and it will change your life instantly.
The other secret is your outfit. The black spaghetti strap dress in the photo is a classic choice because it creates a strong silhouette and doesn’t distract from the background. Play with different textures like silk, satin, or even a chunky knit, but keep the colors muted. The aesthetic is about being understated, so nothing neon or loud.
If you’re on a super tight budget, use the self-timer and lean your phone against a glass or a mug. It’s not fancy, but it works, and the simplicity of the shot often looks better anyway. Remember that the ultimate goal is to look effortless, so spending the entire day preparing defeats the whole purpose.
## The Skincare and Makeup Angle That Completes the Look
You can’t have a beauty photo without actually having some beauty basics down. The key here is a fresh, dewy complexion, even if you are just applying lipstick like the woman in the inspiration photo. Your skin should look like skin, so skip the heavy foundation for this kind of shot.
We all have our moments where things go wrong, and that is okay. The old money look is not about perfection, it’s about presenting a composed version of yourself, flaws and all. A little bit of concealer, some mascara, and a nude or rosy lip color is truly all you need to complete the look.
Set your makeup with a good powder, because a shiny forehead in a warm golden light can look sweaty instead of glowy. A tiny blotting sheet does wonders, I honestly use them right before I take the photo. It keeps the light hitting your skin in a flattering way, instead of bouncing off an oil slick.
## Try This Even If You Only Have Ten Minutes
Not every photo session has to be a planned event, some of the best mirror selfies are completely spontaneous. If you have ten minutes, you have enough time to freshen up, fix your hair, and set up your phone. Don’t throw in the towel just because you don’t have a huge block of time.
Keep a few presets saved in your Lightroom library so you can just tap once and see if the vibe works. I have a specific preset I use for this golden bathroom look that I made myself, and seeing it saved there makes me happy. Steal that habit, it saves you so much time and hassle.
Another quick win is to use the auto-setting in Lightroom to get a baseline, then apply your old money adjustments. It gives you a solid starting point and cuts your editing time in half. Just be sure to check the white balance first, because auto can be a little weird in golden light.
So the next time you catch your reflection in a store window or a friend’s house, maybe pay attention to how the light falls on things. Then try to recreate that same mood when you get home, because it’s a skill you can actually practice. Your own gold bathroom edit is waiting, all it takes is a little warmth and the right preset.
What’s stopping you from giving your mirror selfies that expensive glow up tonight? Go ahead, play around with your settings, and don’t be afraid to mess up a few photos before you get it right. I’d love to hear which trick worked best for your space, so drop your experiences in the comments.
Leave a Comment